Jan 5, 2015

[Recipe] Meatless Fried Rice

Fried Rice has always been the easiest meal for me to whip up in a jiffy because it's one-pot and best of all it's just a huge marrying of all ingredients in one wok! Very little to think much about seriously when it comes to preparing a traditional yang zhou fried rice. However, it's a different story when it's meatless!

I thought long and hard how to make the fried rice tasty and still full of flavour with just vegetables alone without the enhancement of taste from chinese sausages and prawns.

Decided upon using the mushrooms and French beans to replace the protein that's missing in the meal. Sweet corn kernels was for the added sweetness to replace the chinese sausages. The rest of the colours were for the added fibre and nutrients and of course visual appeal. 

Fried firm tofu is entirely optional, but since I have a left over piece of it I just included it into this fried rice meal. This added a level of texture to the meal.

Don't these colours look attractive? I was salivating even before the rice was added.

Voila! It's Done!

Serves 4-5pax
Ingredients
1 pot of cooked Basmati Rice (or you may use regular Jasmine Rice)
4 cloves Garlic (minced)
1/2 large Yellow Onion (chopped)
8 stalks French Beans (cut into thin slices)
1/2 Carrot (julienned)
5 Fresh Shitake Mushrooms (sliced thinly)
Corn Kernels from 1 sweet corn
1/2 Red Bell Pepper (cut into cubes/julienned; may substitute it with red chilli that's been seeded)
1 Firm Tofu (cut into cube and pan fried - this ingredient is optional)
Salt to taste

Seasoning
2tbsp Vegetarian Oyster Sauce (commonly known as mushroom sauce - I have instead used an Organic Black Bean sauce)
1tbsp Light Soya Sauce
1tsp Sugar
*Note: prepare this seasoning in a small bowl adding all the seasoning ingredients.

Process
1) Saute Onion and Garlic till fragrant and onion has slightly soften
2) Add in all the vegetables and stir-fry till it's cooked down
3) Add salt to the vegetables and stir-fry till well combined
4) Tip in the rice and add the seasoning
5) Add the firm tofu ^(optional ingredient)
6) Stir and Toss till all ingredients are well combined
7) Serve it warm with a dash of white pepper

Dec 31, 2014

My Love for Hama Perler Beads

Sharing with all of you my new craze in crafting - Hama Beads (also known as Perler Beads, Fuse Beads, Melty Beads....) you get the gist. I was first introduced to this craft by a dear friend, and if you want to know what are these beads are all about, hop over to her blog post here.

These tiny little things turn into wonders when they are place together. Much of it reminds me of how I started with cross stitching, but we deal with tweezers & plastic beads more than with needle and thread here.

I didn't know much about this craft other than the fact that you work on a piece of pattern and fuse the beads together afterwards. But after working on the craft for a week or so, I somehow learn that this craft not only trains the kids' to be focused, it keeps them QUIET while at work *smile*!

I like it that the kids made little items out of the beads into toys they could play pretend with together. It kept them at it for over a few hours (making + playing). It's certainly good news to me, trying to keep the children's minds and hands away from all electronic gadgets!

Some things I picked up as I go along with this craft was -

Be sure to buy sufficient beads from the onset!
For a start, I'd suggest to get at least 1,000 beads of each colour. The starter set that I purchased had only about 300 beads for each of the 20 colours I started with for my children and as we went along we ran out of the common colours such as black, white, off white and brown quite quickly.

Start with at least 30 colours!
It's much like colour pencils. The more colours you have, there's a greater variety of patterns you can work on without compromising on the details and overall look of the finished work. Let's face it, more colours mean more choices *wink*!
The basic tools you require
It's really simple. Most starter kit would come with a tweezer, a peg board, beads and the parchment paper (or wax paper). In case the set you purchase doesn't have all these, you can easily purchase them separately, especially for tweezer and parchment paper (or wax paper). Be sure to use an iron without the steam function or switch the steam iron to a non-steam mode when you fuse the beads together.
*Note: be sure to use baking paper that's coated with wax otherwise the paper would tend to stick to the beads during the ironing process. This actually did happen to me.

For the peg boards, to start with at least 2 Large Square Boards (cos some patterns are simply too big, you'd need to join the 2 square boards together), 1 Large Hexagon Board and 1 Large Round Board. Some patterns require different shaped boards.
The temperature control
In my own experience, I realised that the Midi beads (5mm) requires a higher heat to fuse properly. When the heat is too low, some of the beads would not fuse and will pop out of the peg board thus effort wasted in piecing the beads together.

As for the Mini beads (2.6mm), it requires medium level heat to fuse. When the heat is too high, the beads melt too quickly causing your craft to go out of shape.

To keep the craft item in proper shape, it's best to place something heavy on it after the beads are fused together. This will prevent the item from curving or go out of shape.
Storage of the craft materials
As the beads mess up easily, would be great to store them into plastic boxes with compartments. It's easier to reach out to the colours you want at a glance without having to plough through the load of mixed coloured beads.

I store all the materials for this craft into a transparent large plastic box (bought from Ikea). The kids have easy access to it and we know what's in the box from the outside.

For the patterns, I place the printed patterns into a clear folder, for easy reference and access.

Where to get all the fancy patterns?
If you are introducing this craft to your children, do bear in mind that kids naturally have short attention span. My kids couldn't sit beyond 20mins on one pattern, so I chose patterns with as few beads as possible. Since my Little Man is a fan of Minecraft, I downloaded some of the Minecraft patterns for him. While Missy, I chose a few more girly patterns for her to try. Beyond that, the kids decided to create some of their own patterns - honing creativity!

Here's where ALL of my patterns come from, my Pinterest Board! Come follow my board as I update with new patterns very often. To date, I've already pinned up to 860 patterns on my board *smile*.

Where to buy?
Hama/Perler Beads
I bought all of my beads and tools from TaoBao and if you'd like to explore the merchants I've bought from here are the links -
5mm Bead Set
2.6mm Bead Set
5mm Beads in individual colours
2.6mm Beads in individual colours

If you would like to buy locally, check out my friend's blog post, she has shared links of several places in Singapore that sell the craft items.

Peg Boards
For 5mm Beads
For 2.6mm Beads

Storage Boxes
This is a 30 compartment plastic storage box. Check out details here
Photo Source: TaoBao
What can you do with the Hama beads craft items?
It's as creative as you can get in making these items useful. I've made them into keychains, fridge magnets, charm for the bag, coasters, pot holders, decorative item for a notebook.
I've seen some being made into a decorative item for a christmas/birthday card, christmas tree ornaments, ear rings, pendant, rings, storage boxes etc... so many things can be made out of these beads so get creative!

*Disclaimer: I am not paid to do this post neither are all the links shared on this post affiliated to any merchants. I am mainly sharing out of the passion I have for this craft. 

Nov 25, 2014

[Recipe] Char Siew Pastry (叉烧酥)


The idea came upon making Char Siew Pastry (BBQ Pork Pastry), when I stopped by Phoon Huat for some shopping and picked up a package of puff pastry.

I've been thinking of making Char Siew Pastry for a while now, after reading this blog post by Christine of Christine's Recipes and finally got my act together. You can imagine how gleeful I was when I can have a taste of one of my favourite tim sum snack, yet have it homemade within a short time.
I am not a purist and really, I DO NOT enjoy rolling, folding & turning the dough to make my own puff pastry, it's simply too tedious and time consuming. So thank goodness for ready made puff pastry sheets. You really can't go wrong with store bought puff pastry sheets. The savings of time and energy will definitely motivate me to make more puff pastry snacks in the future.

So without further adieu, here's the recipe for making that Char Siew Pastry (叉烧酥)

Ingredients
Pastry
1 pack puff pastry sheets, thawed in the refrigerator (I used only 9 sheets of puff pastry)
1 egg beaten (add approx 1Tbsp milk and mix well); for eggwash
2-3 Tbsp Sesame seeds (optional)
*Tip: Always store the rest of the puff pastry sheets in the fridge as you work on one sheet at a time. Maintain the puff pastry in a low temperature will make it easier to handle in addition, the pastry will turn out crispy.

Filling
500gms BBQ Pork*, (叉烧), diced into small cubes
130ml Water
2-3 Tbsp of sweet char siew sauce (you can request for this from the stall owner; be sure to ask for only the sweet char siew sauce)
2 Tbsp Corn Flour
1 Tsp Dark Soya Sauce
2 Tsp Sugar
3 Shallots minced
*Note: I bought ready made char siew from the roasted meat stall at the wet market. You may make your own char siew if you like, here's a recipe for homemade char siew. To obtain the char siew sauce just follow the recipe accordingly.

Process

  • Mix all the filling ingredients, except the char siew & minced onions, in a bowl till well combined, set it aside.
  • Heat up a frying pan with 2 tsp of olive oil and fry the onions till fragrant.
  • Add the filling mixture (without the char siew) into the pan and stir constantly under low heat till the mixture thickens. 
  • Turn off the heat and tip in the chopped char siew into the mixture, mix till well combined then set it aside till it cools down completely.

  • Preheat oven to 200C, prepare baking trays with parchment paper laid.
  • Flour your work surface lightly with plain flour and lay the sheet of puff pastry down, cut the pastry sheet with a circle cutter or you may use a knife to cut the puff pastry into triangular shape. (I was able to cut approximately 5 circles out of 1 sheet of puff pastry).
Note: Ignore the 9 circles I've cut out in this photo, I realized it was too small hence changed to a larger circle cutter after which 
  • I used approximately 2 teaspoonfuls of filling to 1 circle of pastry.
  • Brush the egg wash on the edge of the pastry before folding it into half and use a fork to press down on the outer edge of the pastry (see photo below) to seal the side. Do bear in mind not to fill the circles with too much filling otherwise the sauce will start leaking out of the pastry half way during the baking process.
  • Before sending these 'babies' into the oven, brush the surface lightly with egg wash and sprinkle some sesame seeds on top.
  • Bake for approximately 15-19 mins (that was the time the pastry took in my oven to turn golden brown and puffy).
  • Once baked, take the char siew pastry out and let them cool on a cooling rack.
  • Store them in air tight containers after they are completely cooled. It didn't take more than 24hours the Char Siew Pastries were all GONE *smile*
  • The pastry will turn soft after a few hours so to have the crispy crunch again on the pastry, simply heat up your toaster oven for just 5 minutes, place the char siew pastry into the toaster oven for approximately 5 minutes it should turn out crispy again.
I have shared a few other ideas on how to use the puff pastry sheets, so be sure to check them out -


Oct 31, 2014

[Recipe] Herbal Soup Bowl

I know many people drink herbal soup without consuming the herbs but I on the other hand, love to clean out the entire bowl of soup. It's so comforting savouring the entire bowl of goodness, soup, herbs (those which are edible of course), dregs and all! 

I grew up drinking such soups and have learned to appreciate every bit of such soups that my mom used to prepare for me. Now that I am not under her direct care anymore, I'd make sure to recreate that childhood nostalgia by preparing such soups for my family. 

This soup was prepared from scratch in which I gathered the ingredients on my own (read: did not buy pre-pack herbs). It's rather easy to locate all these ingredients in any chinese medical hall. Go to Hock Hwa if there's one nearby you they are very well stocked and everything is nicely packed which makes obtaining them an easy task.

For easy reference here's the recipe
500gms  Pork Ribs (preferably those with a little more meat as it will flavour the soup better)
5-6 pieces Dried Chinese Yam
20gms Solomon's seal Rhizome
50gms Gordou Eurylae Seeds
50gms Red Lotus Seeds
50gms Lily Bulb
20gms Dried Longans

Process
1) Boil of pot of water sufficient to just scald the pork ribs; Scald the pork ribs for 5-8mins and set it aside. Pour away the water.
2) On a separate soup pot place scalded pork ribs with the rest of the ingredients. Fill it with water till all pork ribs are submerged in water.
3) Bring the water to a boil then simmer for 2 hours.
4) Add salt to taste


Oct 29, 2014

[Recipe] The Black & White Chicken Soup

As you can tell from one of my earlier posts, I love making soups, drinking soups has always been such a pleasure to me. Naturally, I'd research more and try out new recipes in making soups. While I do love the chinese herbal chicken soups, I also love to explore new ways of making other chicken soup as well.

Here's a recipe I've discovered and adapted from a chinese cook book (which I cannot remember where I've seen it before, so I am sorry I am unable to share the resource from which I've taken from).
So what's this black & white chicken soup about? I love the white & black fungus, also known as (white) snow ear fungus and (black) cloud ear fungus; they have many other names to it, but you know what I am referring to right?

Here's a super simple and absolutely yummy chicken soup that anyone can prepare in very little time.

Ingredients
30gms White Fungus (add less or more to your preference)
30gms Black Fungus (add less or more to your preference)
500gms Chicken Winglets
4-5 thin slices of Ginger
3-4 stalks of spring onions
1 tbsp rice wine
1 tbsp soya sauce
Salt to taste


To prepare the white and black fungus, they usually come in the dried form so all you need to do is give them a good rinse and soak them for up to an hour to rehydrate them. Once they have fluff up, just trim the stalk or hard areas off, cut them into smaller pieces for ease of consumption.
*Quick tip: when choosing white fungus, select those that are slightly yellow in hue, try to avoid getting them if they are in pure white form as they might be bleached in the process of packaging. 


Clean the chicken winglets thoroughly (you may also use other parts of the chicken for this soup, ideally chicken breast meat which gives flavour), add all other ingredients into the soup pot, fill it up till water covers all the ingredients. Bring the soup to a boil and simmer it for 40-50mins (or till the white/black fungus have soften).

Add the seasoning to your preferred taste and garnish the soup with parsley(optional), that's it!

Preparing soups is just such a joy and drinking them is simply comforting. So do make more soups as it truly nourishes!

Oct 27, 2014

[Recipe] Quick & Easy Dishes

I am no gourmet chef, neither have I the luxury of time to prepare elaborate meals on a daily basis. I'd usually go for simple quick-fix or easy dishes to make up our daily dinners.

Over time, I've picked up on the experience of meal prep with the least amount of time and effort. What's more important is not compromising on the nutritional value of the food while keeping the budget in mind at the same time.

So here's something I prepare regularly on our daily dinners. Oh, in case you didn't know, I only cook one meal a day (well usually, unless I am in the mood for "slaving" in the kitchen, which is rare these days).

I love to use ready teriyaki sauce, I used to buy Mizkan's thick teriyaki sauce until they stopped production, I then found this other thick teriyaki sauce by Kikkoman to be somewhat as good as Mizkan's.


Life gets easy in the kitchen when you have this bottle of sauce on hand. I make grilled teriyaki chicken and salmon a lot and they have been a hit with my family ALL the time!


All you need to do is to clean the chicken or salmon fillet thoroughly, pat it dry, sprinkle some pepper on top and spread this luscious thick sauce generously on the chicken or salmon marinate it for just 15mins. Pop it into the oven (preheated to 180C) or toaster oven (I love my toaster oven, as it heats up much faster than a regular oven), grill it for 20-30mins and voila! Serve it with a sprinkle of sesame seeds if you like and you are good to go!

Teriyaki Chicken Thigh
Teriyaki Salmon Fillet
Best part of preparing this, is I only need to rinse the baking tray with water, hah! Because, I laid a piece of aluminium foil on the tray and place the meat/fish on a piece of parchment paper before sending it into the oven. Talk about time & effort saving! 

Oct 23, 2014

Comforting Chicken Soup

It's the year end and it's been raining rather often lately. What better time than it is now to have a wonderfully nice bowl of chicken soup that nourishes and comfort ourselves with.

Hubby has been working late (even weekends) lately and the weather has been rather erratic recently, with the haze looming in the air. I've decided that we need to boost our immunity and strengthen our overall health, so I made it a point to prepare nourishing soups at least twice a week now.

Sharing in verbatim, as said by the author of this book -
Photo Credit Link
Soups transform our health, drinking soup helps to ease mental tension, minimizes weakness,  fatigue and relieves symptoms of overworking commonly suffered by urbanites such as tension, stress and disrupted metabolism.

I bought a pack of these Cordycep Militaris (冬虫草花) commonly known as Cordycep Flowers, recently, it's not the first time I've prepared soups with this ingredient, it's still one of my favourite ingredients for chicken soup.

Preparing soups is really not that difficult, it just requires time for the essence of the ingredients to be fully released. The time required for active preparation is not more than 10mins tops! Which is why, I can just survive on soups if I don't have a brood to feed *smile* I am not particularly excited about slaving in the kitchen for hours just to prep meals.

Sharing the recipe and the nourishing tidbit about the Cordycep Militaris here (click on link) which I wrote in detail some time back when I was still actively working on Munch Ministry. I hope it'd benefit you one way or another.

Eat healthy and be healthy!

Sep 26, 2014

[Recipe] Chicken Dashi Shoyu Ramen

As I take more time to focus on what's more important lately, I've prepared more one pot meals. I still desire to feed my family well but I will not attempt something fancy which is time consuming or requires a lot of new fancy sauces that I have to accumulate in my already close to 'exploding' kitchen storage space.

Ramen, something I've made quite often which requires very little effort and time. In the past, the Ramen that I prepared was made in miso soup base. Today, I tried something different, and it was great! I just had to share the recipe with all of you! *smile*

The broth was made with chicken breast meat, dashi stock and soya sauce. It's simply a perfect combination. The thing is, it's not bothersome nor require many steps to get the broth prepared.
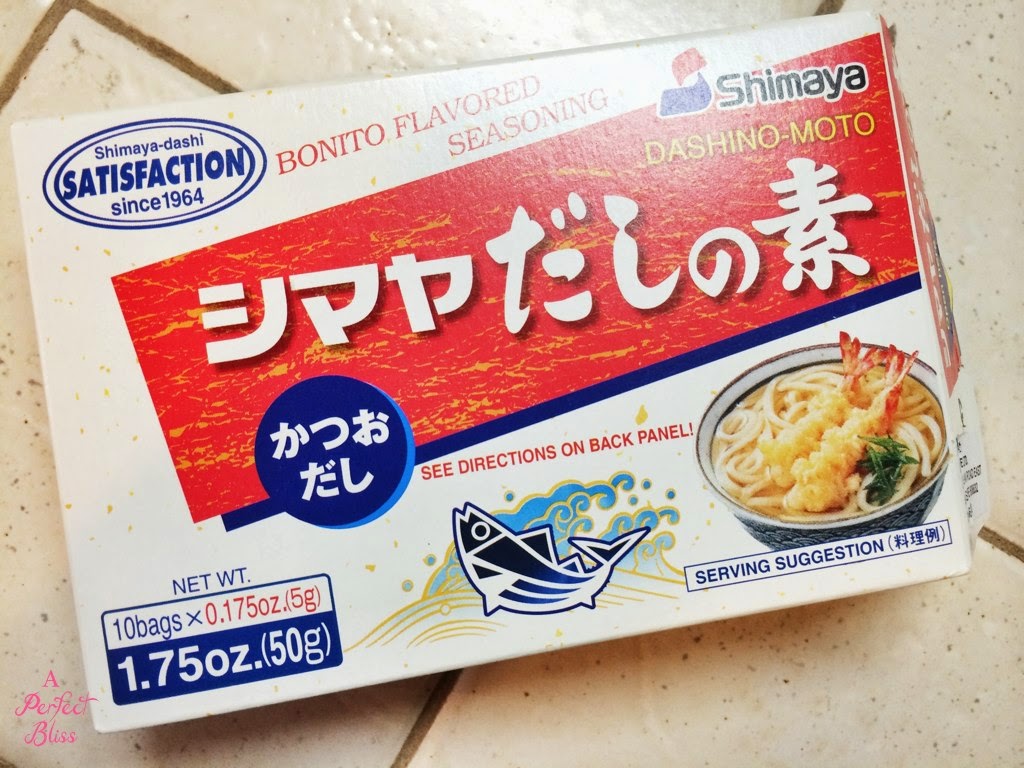
This is the dashi stock powder that I've used as part of the ingredients for the soup base. It can be easily found in most supermarket's Japanese food section.

As for topping for the Ramen, it's as fancy as you want it to be. I prefer char siew as I have a great char siew recipe that always never fails.

Nice oven grilled char siew ready to be served.

To save time, I always purchase this pack of bean sprout as the head and tail end of the bean sprouts are already plucked. Alternatively, you may also use baby bok choy for this ramen meal.

Surprised that I use pasta for ramen? heh... the idea was taken from here in which these Japanese ladies who lived in the USA couldn't find another noodle that has a texture as close to ramen as these pasta. So take it from the Japanese, not me, about using pasta as an alternative if you can't find ramen noodles in the supermarket nearby you.

So seriously, how easy is it to make this Ramen meal? See for yourself -

Ingredients
*serves 4 people
400-500gms shoulder butt pork (see char siew recipe here)
1 large skinless chicken breast meat (approx 300gms)
100gms bean sprouts
Angel Hair pasta (amount of pasta as required accordingly)
4 eggs (recipe for lava egg here)
2 tbsp light soya sauce (adjust to your preference of saltiness)
1 tsp dark soya sauce
2 sachet packs of dashi stock
Chopped spring onions and chilli (optional)
Nori sheets or Nori topping

Process
1) Wash chicken breast meat thoroughly and place it into a soup pot filled with approx 3ltrs of water. Bring it to a boil and let it simmer for 1hr.
2) 15mins before soup base is ready, boil pasta in boiling water (follow instructions on the time of cooking the pasta accordingly).
3) Once soup has simmered for an hour, add in seasoning of light soya sauce, dark soya sauce and dashi stock stir till well combined. Set it aside for later use.
4) On a separate saucepan, boil some water to blanch bean sprouts (or any other green vege you plan to use) till it's sufficiently cooked.
5) Assemble all the ingredients together - add soup in bowl, followed by cooked noodles, top with char siew, bean sprouts, spring onions and nori sheets if you have otherwise, you could use nori topping like I did in my ramen.

Enjoy!

Aug 5, 2014

Our Dinner The Past Two Weeks

When the week has been peppered with public holidays or no-school days, I do get thrown off my routine, which explains my lack of updates on my grocery hauls and dinner plan updates. Not that I didn't do any grocery shopping or didn't prepare any dinners, just that I haven't got the luxury of time to fill in the details into this space.

So this is a consolidation of what we had for dinner in the past two weeks. Once again, I am a no frills person, so dinners have as usual been simple, easy & fast to prepare.

Hope this gives you some ideas as you make your dinner plans.

Our $60 worth dinners two weeks ago -

Monday - Taiwanese Braised Pork Rice served with Bok Choy
Tuesday - Pan Seared Fillet in garlic cream sauce served with fries and baby french beans
Wednesday - Fried Kway Teow
Thursday - Ayam Pongteh and Stir-fry vegetables
Friday - Soba Noodles
Saturday - Potato Beef Soup and long bean omelette

Last week, our dinners costed $50+ -
Monday - Claypot Chicken Rice with Watercress Soup
Tuesday - Chicken Macaroni Soup
Wednesday - Minced Pork Tofu and Spinach & Eggs Medley
Thursday - Steamed Fish in Japanese sauce, Lotus Root Soup and stir-fry vege
Friday - Tauhu Goreng with premade peanut sauce

I was really heartened to learn that another mommy (click on the link) shared her $50 budget dinners and you'll be inspired too!

Jul 29, 2014

[Recipe] Taiwanese Braised Pork Rice

I really love a great bowl of Taiwanese Braised Pork Rice and have been craving it for a few days before I decided to prepare it for dinner that day.

It's perfect comfort food to me. Gives me loads to feel nostalgic about. I remember my mom used to prepare braised pork rather regularly and it's definitely one of my favourite food though I don't cook it often these days for the fear of increasing the cholesterol level a notch higher in me.

Preparing this braised pork rice was one of the easiest meal I've ever made. This is why I love one pot meals! 

Here's what you'd need -
Ingredients
2 medium size shallots (chopped)
3-4 cloves of garlic (minced)
1-2 stalks of spring onions (chopped)
1 red chilli (seeded and diced; leave the seeds in if you like the spice)
200gms minced pork
400gms pork belly (scalded in water for 15mins)
1.5 tbsp rock sugar
1 piece of Licorice
1/4 tsp of 5 spice powder
dash of pepper
5tbsp light soya sauce
5tbsp dark soya sauce
1-1.5 cups chicken stock
Green leafy vegetables (blanch till cook and set aside) 
Method
1) Heat up a few tsp of oil in a pot
2) Pour in minced pork stir fry till cooked 
3) Add in pork belly, let it cook 5mins
4) Add spring onion, chopped shallots, minced garlic, chilli, fry with mixture for 1 min
5) Pour in both types of soya sauce
6) Add chicken stock, 5 spice powder, licorice, pepper and rock sugar
7) Bring mixture to a boil then simmer for 1.5hrs or until meat is tender
8) Serve with white rice and vegetables

If you wish to know where the inspiration of making this Taiwanese Braised Pork rice came from, watch the video below. I've adapted majorly from it.